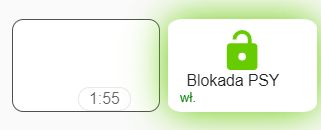
Witam,
Próbuję do kart odpowiedzialnej za blokadę czasową drzwi (testowo 2 min) dodać pozostały czas timera.
Tymczasowo zrobiłem 2 oddzielne karty, jedną do uruchomiania blokady drzwi oraz drugą pokazującą pozostały czas blokady - timer.
Niestety nie wiem jak połączyć te dwie karty - chciałbym do karty z przyciskiem dodać timer. Tymczasem załaczam moje wypociny.
Plik yaml przycisku:
type: custom:button-card
icon: mdi:lock-open
entity: switch.tasmota_1
name: Blokada PSY
show_state: true
layout: vertical
size: 10%
styles:
card:
- height: 100px
- background-color: rgb(255,255,255)
- border: 1px solid rgb(80,80,80)
- border-radius: 10%
- font-family: sans-serif
- padding: 5%
label:
- color: gray
- font-size: 9px
- justify-self: start
- padding: 0px 5px
name:
- text-transform: none
- justify-self: left
- padding: 0px 12px
icon:
- color: rgb(102,204,0)
- width: 60px
- height: 60px
- padding: 10px 55px 5px 55px
state:
- justify-self: left
- font-size: 14px
- padding: 0px 5px
state:
- value: ‘on’
styles:
state:
- color: green
card:
- filter: drop-shadow(0 0 1.5rem rgb(102,204,0))
- border: 0px- value: ‘off’
styles:
state:
- color: red
name:
- color: rgb(117,117,117)
icon:
- color: rgb(117,117,117)
show_name: true
show_icon: true
Plik yaml timera:
type: custom:button-card
entity: switch.tasmota_1
show_name: false
size: 65%
custom_fields:
timer:
card:
type: custom:button-card
entity: timer.test
tap_action: none
show_state: true
show_name: false
show_icon: false
style: |
ha-card.button-card-main {
font-size: 20px !important;
}
styles:
card:
- height: 100px
- background-color: rgb(255,255,255)
- border: 1px solid rgb(80,80,80)
- font-family: sans-serif
- padding: 5%
label:
- color: gray
- font-size: 9px
- justify-self: start
- padding: 0px 5px
name:
- text-transform: none
- justify-self: left
- padding: 0px 12px
icon:
- color: rgb(255,255,0)
- width: 60px
- height: 60px
- padding: 10px 55px 5px 55px
state:
- justify-self: left
- font-size: 14px
- padding: 0px 5px
grid:
- position: relative
custom_fields:
timer:
- filter: |
[[[
if (states[‘timer.test’].state == ‘active’)
return “opacity(70%)”;
return “opacity(0%)”;
]]]
- position: absolute
- left: 44%
- top: 78%
- height: 30px
- width: 56px
Innymi słowy jak dodać kartę timera do istniejącej już karty przycisku

