Przełącznik mqtt

Do arduino uno wraz z dodatkiem ethernet shield w5100 wgrałem sketch zawierający 4 przekaźniki mqtt i teraz tak. Mogę sterować (czyli załączać i wyłączać po kolei każdy z 4 przekaźników ) publikując w temacie mosquitto led zmienną “1on” lub “1off” i to działa w node red jak wyzwalam taką publikacje to też wszystko gra. To może konkretnie tak urządzenie nasłuchuje w temacie led .W terminalu to bedzie subskrybcja " mosquitto_sub -d -t led " a po stronie publikacji wystarczy opublikować ( mosquitto_pub -d -t led -m “1on”) lub ( mosquitto_pub -d -t led -m “1off”). I tu kończą się dobre wiadomości bo w pliku mqtt.yaml co bym nie wpisał to przełącznik nie działa. Np. w sonoff temat jest rozbudowany a tu tylko ten led ?
taki wpis działa na sonoff:

  • platform: mqtt
    name: “wyl_korytarz_rgb”
    state_topic: “stat/wyl_korytarz_rgb/POWER”
    command_topic: “cmnd/wyl_korytarz_rgb/power”
    payload_on: “ON”
    payload_off: “OFF”
    retain: true
    a taki daję do tego przełącznika:
  • platform: mqtt
    name: “wyl_4testowy”
    state_topic: “stat/led”
    command_topic: “cmnd/led/”
    payload_on: “1on”
    payload_off: “1off”
    state_on: “1on”
    state_off: “1off”
    retain: true
    No i inne ale żadne nie działają.

Czy masz podpięty plik mqtt.yaml pod configuration.yaml ?
Przełączniki umieszczaj w switch.yaml a w pliku configuration.yaml switch: !include switch.yaml

Program do monitorowanie MQTT
MQTT explore

  • platform : mqtt

    name: “lctechrelay”

    state_topic: “/ESP_Easy/LCTECH/Relay0”

    command_topic: “/ESP_Easy/LCTECH/Relay0”

    payload_on: “1”

    payload_off: “0”

    optimistic: false

  • platform : mqtt

    name: “Bethany Desk Lamp”

    state_topic: “stat/bethany_desk_lamp/POWER”

    command_topic: “cmnd/bethany_desk_lamp/POWER”

    payload_on: “ON”

    payload_off: “OFF”

    optimistic: false

espswitch0:

  command_on: "curl -X GET 'http://192.168.1.58/control?cmd=relay,0,1'"

  command_off: "curl -X GET 'http://192.168.1.58/control?cmd=relay,0,0'"

  #command_state: "curl -X GET 'http://192.168.1.58/control?cmd=relay/'"

  value_template: "{{ value_json.status == '1' }}"

  #value_template: '{{ value_json["espswitch0"]["state"] == "on" }}'


  #friendly_name: espswitch0

Dobrze rozumiem że arduino nasłuchuje na temacie led, a konfiguracji jest ustawiony cmnd/led/ ?
Jakiej biblioteki używasz na arduino, da się tam wypisać na konsole co przychodzi i na jaki temat ?

Przepraszam ,że nie odpowiedziałem wcześniej .
Sprawa wygląda tak ,że zadziałał wpis do konfiguracji sam temat czyli led i wszystko gra . Poza jednym ,że ten sketch jest jakiś niestabilny przestał załączać przekaźniki mimo potwierdzenia po mqtt . Niestety nie potrafię napisać nowego.
A urządzenie jest bardzo fajne i w domoticz z wgranym sketchem mysensor relay działa pod domoticzem i steruje 7 optotriakami ogrzewania od dłuższego czasu.
Połączenie po lanie jest stabilne i element wykonawczy może być zamknięty w metalowej skrzynce a wifi już niebardzo.
Pozdrawiam i dziękuję za zainteresowanie

No w sumie to trochę żal mam jeszcze jeden sketch bardziej rozbudowany pod arduino uno +w5100 ze sterowaniem mqtt przekaźnikami ale brak kontaktu choć tematy są dobrze opisane . Może ktoś chciałby nad tym popracować to mogę komplecik podesłać.
Tutaj link do sketcha MQTT with the W5100 Ethernetshield – Arduino, ESP8266, ESP32 & Raspberry Pi stuff

Wpisałeś mac adres swojego W5100 do tego szkicu?

Tak i adres brokera
Jedyne czego nie wpisałem to usera i password do brokera ale ha mott mam ustawione anonimous na true

Od zawsze mnie fascynuje nieprzewidywalność elektroniki a raczej niedoskonałość ludzka w kontakcie z elektroniką. Okazuje się ,że to nie układ był niestabilny tylko ja czyli sterowanie Arduino UNO +w5100 z tematem led działa unieruchamiał go pozostawiony w node red przy próbach node mott in publikujący w temacie led “4off” i to on blokował przełącznik po usunięciu przełącznik śmiga. Czyli teraz na forum arduino ktoś pomoże przerobić sketch ,żeby było 8 przekaźników i można zacząć próby działania i niezawodności. Może tu ktoś się pokusi o przerobienie sketch-a ?

"
/*
Example MQTT-switch-relay-node with 4 buttons and 4 leds

  • connects to an MQTT server

  • publishes “hello world” to the topic “led”

  • subscribes to the topic “led”

  • controls 4 leds on pins 2,3,5 and 6 - leds can be replaced with relays

  • reads 4 button on pins 7,8,9 and 10

  • turns on/off a specific led when it receives a specific “on”/“off” from the “led” topic

  • sends a specific “on”/“off” to the “led” topic a specific button is pressed

  • multiple arduino’s with same generic sketch can run parallel to each other

  • multiple arduino’s need each to have a unique ip-addres, unique mac address and unique MQTT client-ID

  • tested on arduino-uno with W5100 ethernet shield

  • Ethernet Shield W5100 uses pins 4,10,11,12,13

  • availbale digital pins: 1,2,3,5,6,7,8,9,10
    */

//------------------------------------------------------------------------------

#include <SPI.h>
#include <Ethernet.h>
#include <PubSubClient.h>
#include <Bounce2.h>

// Set led variables to Arduino digital pins
int led1 = 2;
int led2 = 3;
int led3 = 5; // pin 4 used by ethernet shield
int led4 = 6;

// Set button variables to Arduino digital pins
int button1 = 7;
int button2 = 8;
int button3 = 9;
int button4 = 10; // pins 11,12,13 used by ethernetshield

// Set variables to act as virtual switches
// Set variable values initially to LOW (and not HIGH)
int led1Value = LOW;
int led2Value = LOW;
int led3Value = LOW;
int led4Value = LOW;

//---------------------------------------------------------------------------

// Arduino MAC address is on a sticker on your Ethernet shield
// must be unique for every node in same network
// To make a new unique address change last letter

byte mac[] = { 0xDE, 0xAD, 0xBE, 0xEF, 0xFE, 0xEE };

// Unique static IP address of this Arduino - change to adapt to your network
IPAddress ip(192,168,0,238);

// IP Address of your MQTT broker - change to adapt to your network
byte server[] = { 192, 168, 0, 20 };

// Handle and convert incoming MQTT messages ----------------------------------------

void callback(char* topic, byte* payload, unsigned int length) {
// handle message arrived
String content="";
char character;
for (int num=0;num<length;num++) {
character = payload[num];
content.concat(character);
}
Serial.println(topic);
Serial.println(content); // message sent out by button actions is returned from broker and serial printed

// Set specific virtual switches on basis of specific incoming messages ----------------------------

if (content == “1on”) {
led1Value = HIGH;
}

if (content == “1off”) {
led1Value = LOW;
}

if (content == “2on”) {
led2Value = HIGH;
}

if (content == “2off”) {
led2Value = LOW;
}

if (content == “3on”) {
led3Value = HIGH;
}

if (content == “3off”) {
led3Value = LOW;
}

if (content == “4on”) {
led4Value = HIGH;
}

if (content == “4off”) {
led4Value = LOW;
}

// Set digital pin states according to virtual switch settings

digitalWrite(led1,led1Value);
digitalWrite(led2,led2Value);
digitalWrite(led3,led3Value);
digitalWrite(led4,led4Value);

}

// Initiate instances -----------------------------------

EthernetClient ethClient;
PubSubClient client(server, 1883, callback, ethClient);

// Initiate a bouncer instance for each button
Bounce bouncer1 = Bounce();
Bounce bouncer2 = Bounce();
Bounce bouncer3 = Bounce();
Bounce bouncer4 = Bounce();

//-------------------------------------------------------

void setup()

{

// setup led, button, bouncer 1 -----------------------
pinMode(led1, OUTPUT);
pinMode(button1,INPUT);
digitalWrite(button1,HIGH);
bouncer1 .attach(button1);
bouncer1 .interval(5);

// setup led, button, bouncer 2 -----------------------
pinMode(led2, OUTPUT);
pinMode(button2,INPUT);
digitalWrite(button2,HIGH);
bouncer2 .attach(button2);
bouncer2 .interval(5);

// setup led, button, bouncer 3 -----------------------
pinMode(led3, OUTPUT);
pinMode(button3,INPUT);
digitalWrite(button3,HIGH);
bouncer3 .attach(button3);
bouncer3 .interval(5);

// setup led, button, bouncer 4 -----------------------
pinMode(led4, OUTPUT);
pinMode(button4,INPUT);
digitalWrite(button4,HIGH);
bouncer4 .attach(button4);
bouncer4 .interval(5);

// setup serial and ethernet communications -------------------------------

// Setup serial connection
Serial.begin(9600);

// Setup ethernet connection to MQTT broker
Ethernet.begin(mac);
if (client.connect(“arduino-ip-238”)) { // change as desired - clientname must be unique for MQTT broker
client.publish(“led”,“hello world - here arduino ip 239”);
Serial.println(“connected”);
client.subscribe(“led”); // subscribe to topic “led”
}
}

//----------------------------------------------

void loop()
{

// Listen for button interactions and take actions ----------------------------------------
// Note: Button actions do send MQTT message AND do set led(x)Value to HIGH or LOW

if (bouncer1.update()) {
if (bouncer1.read() == HIGH) {
if (led1Value == LOW) {
led1Value = HIGH;
client.publish(“led”,“1on”);
} else {
led1Value = LOW;
client.publish(“led”,“1off”);
}
}
}

//-----------------------------------------------

if (bouncer2.update()) {
if (bouncer2.read() == HIGH) {
if (led2Value == LOW) {
led2Value = HIGH;
client.publish(“led”,“2on”);
} else {
led2Value = LOW;
client.publish(“led”,“2off”);
}
}
}

//------------------------------------------------

if (bouncer3.update()) {
if (bouncer3.read() == HIGH) {
if (led3Value == LOW) {
led3Value = HIGH;
client.publish(“led”,“3on”);
} else {
led3Value = LOW;
client.publish(“led”,“3off”);
}
}
}

//-----------------------------------------------

if (bouncer4.update()) {
if (bouncer4.read() == HIGH) {
if (led4Value == LOW) {
led4Value = HIGH;
client.publish(“led”,“4on”);
} else {
led4Value = LOW;
client.publish(“led”,“4off”);
}
}
}

//------------------------------------------------

client.loop();
}

// End of sketch ---------------------------------
"
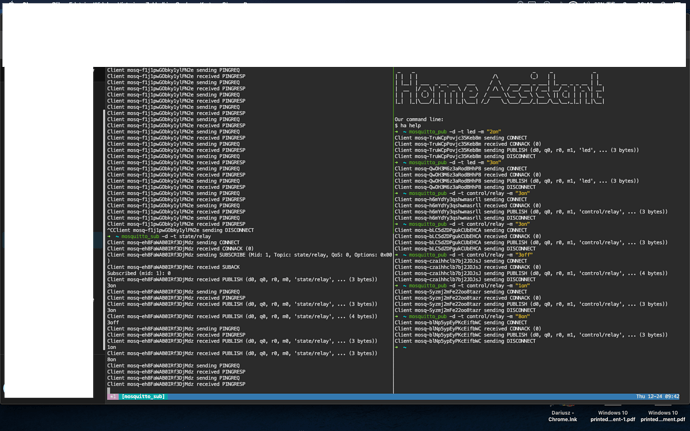
Nie mam takiego zestawu żeby to przetestować ale może tak zadziała
main.zip (1,5 KB)

Nie bardzo najpierw nie mogłem skompilować błąd
void initRelaysPins();
initRelaysPins();
po zachaszowaniu wgrał gada potwierdza ale przez zachaszowania nie uruchamia przekaźników

Przy próbie kompilacji wywala błąd : "
ino:59: undefined reference to `initRelaysPins()’
collect2: error: ld returned 1 exit status. "

W czym kompilujesz ?
Na początku występują deklaracje funkcji, wygląda na to że ich nie rozpoznaje. Implementacje tych funkcji znajdziesz poniżej spróbuj ją wkleić w miejsce funkcji.
Te których nadal nie będzie widzieć, przesuń na sam początek.

W programie arduino przed wgraniem kompiluje i wgrywa

No nic nie pomaga nie mogę zweryfikować sketch-a zawsze problem z initRelaysPins.

Zerknąłem na to, zrobiłem literówkę w linii 100 trzeba zmienić nazwę na initRelaysPins. Nazwy muszą się zgadzać z tymi na górze.

Jeszcze w linii 60 też literówka po zmianach wgrane i działa ale tylko trochę .
wyjście 10 czyli(8) właczone na stałe komenda na wyjście 2 (1) załącza się si wyłącza 2 nic 3 nic 4 załacza wyjście 1 . Nr 5 załacza wyjście 1 , 6 nic 7 nic.
Generalnie wszystko z opóźnieniem i zawsze załącza się bądź wyłącza nr1
Publikuje mosquitto_pub -d -t control/relay -m “1on”
subskrybcja mosquitto_sub -d -t state/relay

O to chodziło?
relays.ino.zip (1,6 KB)

Przy sprawdzeniu sketch-a pluje takimi komunikatami
"
In function ‘void callback(char*, byte*, unsigned int)’:
relays:81:9: error: ‘client’ was not declared in this scope
client.publish(“state/relay”,“1on”);
^~~~~~
/Users/tytusmacbook/Downloads/relays/relays.ino:81:9: note: suggested alternative: ‘Client’
client.publish(“state/relay”,“1on”);
^~~~~~
Client
relays:86:9: error: ‘client’ was not declared in this scope
client.publish(“state/relay”,“1off”);
^~~~~~
/Users/tytusmacbook/Downloads/relays/relays.ino:86:9: note: suggested alternative: ‘Client’
client.publish(“state/relay”,“1off”);
^~~~~~
Client
relays:91:9: error: ‘client’ was not declared in this scope
client.publish(“state/relay”,“2on”);
^~~~~~
/Users/tytusmacbook/Downloads/relays/relays.ino:91:9: note: suggested alternative: ‘Client’
client.publish(“state/relay”,“2on”);
^~~~~~
Client
relays:96:9: error: ‘client’ was not declared in this scope
client.publish(“state/relay”,“2off”);
"

I dalej aż do “8off”

Teraz u Ciebie już powinno być ok.
relays.ino.zip (1,6 KB)

No i teraz tak walczę z tym i walczę . Działa musiałem zmienić wyjście 10 na A0 bo okazało się ,że w5100 działa też na 10.
Ale to mało ważne wyobraź sobie ,że działa przy wpisywaniu z terminala sub “mosquito_sub -d -t state/relay” i publikacja na (mosquito_pub -d -t control/relay -m “1on” ) .A przy działaniu z przełączników na daschboardzie już nie chociaż działa tylko 1 a pozostałe 2do8 nie . I coś się dzieje złego w tym sketchu bo zmiany są bardzo ospałe wręcz kilkunastosekundowe.Tu wpis z pliku switches/mqtt.yaml

"

  • platform: mqtt
    name: “wlacznik 1”
    state_topic: “state/relay”
    command_topic: “control/relay”
    payload_on: “1on”
    payload_off: “1off”
    #state_on: “1on”
    #state_off: “1off”
    #qos: 0
    retain: true

  • platform: mqtt
    name: “wlacznik 2”
    state_topic: “state/relay”
    command_topic: “state/relay”
    payload_on: “2on”
    payload_off: “2off”
    #state_on: “2on”
    #state_off: “2off”
    #qos: 0
    retain: true

  • platform: mqtt
    name: “wlacznik 3”
    state_topic: “state/relay”
    command_topic: “state/relay”
    payload_on: “3on”
    payload_off: “3off”
    #state_on: “3on”
    #state_off: “3off”
    #qos: 0
    retain: true

  • platform: mqtt
    name: “wlacznik 4”
    state_topic: “state/relay”
    command_topic: “state/relay”
    payload_on: “4on”
    payload_off: “4off”
    #state_on: “4on”
    #state_off: “4off”
    #qos: 0
    retain: true

  • platform: mqtt
    name: “wlacznik 5”
    state_topic: “state/relay”
    command_topic: “state/relay”
    payload_on: “5on”
    payload_off: “5off”
    #state_on: “5on”
    #state_off: “5off”
    #qos: 0
    retain: true

  • platform: mqtt
    name: “wlacznik 6”
    state_topic: “state/relay”
    command_topic: “state/relay”
    payload_on: “6on”
    payload_off: “6off”
    #state_on: “6on”
    #state_off: “6off”
    #qos: 0
    retain: true

  • platform: mqtt
    name: “wlacznik 7”
    state_topic: “state/relay”
    command_topic: “state/relay”
    payload_on: “7on”
    payload_off: “7off”
    #state_on: “7on”
    #state_off: “7off”
    #qos: 0
    retain: true

  • platform: mqtt
    name: “wlacznik 8”
    state_topic: “state/relay”
    command_topic: “state/relay”
    payload_on: “8on”
    payload_off: “8off”
    #state_on: “8on”
    #state_off: “8off”
    #qos: 0
    retain: true
    "