cześć, wpisałem przykładową automatyzacje kolegi “szopen” i niestety mam błędy “Error rendering data template: UndefinedError: ‘dict object’ has no attribute ‘event’”
czy ktoś też ma z tym problemy?
chyba nie, przeniosłem sam plik include.yaml do katalogu w HA
tak to wyglada
alias: Include dates
description: manual
use_blueprint:
path: /config/custom_components/garbage_collection/include.yaml
input:
garbage_collection_entity: sensor.zmieszane
include: |-
2022-07-04
2022-10-03Teraz kliknij przycisk z poprzedniego posta, bo dopiero skończyłem tworzenie przycisku do Blueprinta na platformie My Home Assistant
(u siebie mam beta-wersję, która już nie jest dostępna)
i nie będziesz musiał kombinować z plikami - HA ma być “plug and play”
coś nie tak
w sumie klikniecie w przycisk daje odpowiedz o braku strony html
nie mam zainstalowanego blueprinta w HA, jak go najszybciej doinstalować?
Przeczytaj jeszcze raz - przycisk był zły, bo najpierw udostępniłem przycisk do nieistniejącej już beta wersji (wciąż ją używam, ale przycisk się w niej źle generuje, teraz jest już dobry).
tak teraz działa utworzę automatyzacje i zobaczymy
Error: Error rendering data template: UndefinedError: ‘dict object’ has no attribute ‘event’
A stworzyłeś encję w integracji i posługujesz się automatyzacją zgodnie z dokumentacją Schematu? (oczywiście daty to raczej warto wybrać z przyszłości ![]() )
)
"This automation is triggered from the garbage_collection integration by event garbage_collection_loaded, during the device state update.
It PROCESSES DATA SENT WITH THE EVENT, and then FINISHES THE UPDATE. DO NOT CALL THIS SERVICE MANUALLY, IT WON’T WORK (it won’t have the data).
Also, make sure the INTEGRATION IS CONFIGURED FOR manual_update (that will disable the state update by the integration and pass it to this automation).
Add events on a set of additional dates. Enter one date per line. For example:
2022-01-03
2022-04-04
2022-07-04
2022-10-03
After updating the list, make sure to trigger the entity update. The sensors are normally updated once a day, or when Home Assistant starts. The update can be triggered by updating the integration configuration (just hit configure and submit)."
PS najprostsza metoda sztucznego wywołania automatyzacji to restart HA
Działa znakomicie, dziekuje za pomoc nie miałem zaznaczonego ptaszka w “Stan czujnika aktualizowany ręcznie poprzez wywołanie usługi”
Cześć.
Próbuję wg Twojej instrukcji skonfigurować Garbage Collection, niestety podajemi wartość null w atrybutach next_date, days, last_connection:
Oto moje smieci.yaml:
sensors:
  - name: "Zmieszane"
    frequency: 'every-n-weeks'
    collection_day: 'mon'
    period: 2
    first_week: 2
  - name: "Papier i Szkło"
    frequency: 'every-n-weeks'
    collection_day: 'wed'
    period: 2
    first_week: 2
Jakieś pomysły?
@Kacper
Od wersji bodajże 4.4 konfiguracja YAML jest niewspierana, skonfiguruj z GUI.
Wie ktoś jak zrobić kolory ikon w wersji z sortowaniem??
To nie zależy od integracji ani nawet od wybranej karty
https://forum.arturhome.pl/search?q=kolor%20ikon
mogę się podzielić kodem pod Garbage Collection - może ktoś skorzysta
- brak koloru ramki = brak wywozu w najbliższych dniach
- kolor pomarańczowy = wywóz w dniu jutrzejszym
- kolor niebieski = wywóz dziś
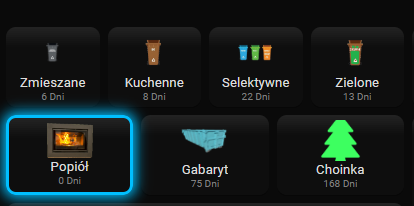
jak się kliknie na dowolną ikonkę wyskakuje popup
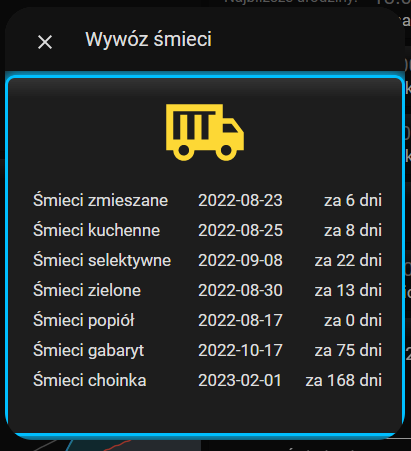
przykładowy wywóz:
type: custom:button-card
template: wywoz_smieci
entity: sensor.smieci_zmieszane
entity_picture: /local/img/smieci/smieci_zmieszane3.png
no i ostatnio mój ulubiony Custom:button-card
button_card_templates:
  wywoz_smieci:
    style: |
      ha-card:hover {transform: scale(1.05);box-shadow: 0 0 10px;}
    type: custom:button-card
    entity_picture: '[[[ return variables.obraz ]]]'
    show_entity_picture: true
    tap_action:
      action: call-service
      service: browser_mod.popup
      service_data:
        title: Wywóz śmieci
        card:
          type: custom:button-card
          entity: calendar.garbage_collection
          show_name: false
          icon: mdi:truck-cargo-container
          tap_action:
            action: none
          custom_fields:
            s_label_1: >
              [[[ return
              states['sensor.smieci_zmieszane'].attributes.friendly_name]]]
            s_label_2: >
              [[[ return
              states['sensor.smieci_kuchenne'].attributes.friendly_name]]]
            s_label_3: >
              [[[ return
              states['sensor.smieci_selektywne'].attributes.friendly_name]]]
            s_label_4: >
              [[[ return
              states['sensor.smieci_zielone'].attributes.friendly_name]]]
            s_label_5: >
              [[[ return
              states['sensor.smieci_popiol'].attributes.friendly_name]]]
            s_label_6: >
              [[[ return
              states['sensor.smieci_gabaryt'].attributes.friendly_name]]]
            s_label_7: >
              [[[ return
              states['sensor.smieci_choinka'].attributes.friendly_name]]]
            s_1: >
              [[[ return
              states['sensor.smieci_zmieszane'].attributes.next_date.slice(0,10)]]]
            s_2: >
              [[[ return
              states['sensor.smieci_kuchenne'].attributes.next_date.slice(0,10)]]]
            s_3: >
              [[[ return
              states['sensor.smieci_selektywne'].attributes.next_date.slice(0,10)]]]
            s_4: >
              [[[ return
              states['sensor.smieci_zielone'].attributes.next_date.slice(0,10)]]]
            s_5: >
              [[[ return
              states['sensor.smieci_popiol'].attributes.next_date.slice(0,10)]]]
            s_6: >
              [[[ return
              states['sensor.smieci_gabaryt'].attributes.next_date.slice(0,10)]]]
            s_7: >
              [[[ return
              states['sensor.smieci_choinka'].attributes.next_date.slice(0,10)]]]
            s_11: >
              [[[ return "za " +
              states['sensor.smieci_zmieszane'].attributes.days + " dni" ]]]
            s_12: >
              [[[ return "za " +
              states['sensor.smieci_kuchenne'].attributes.days + " dni" ]]]
            s_13: >
              [[[ return "za " +
              states['sensor.smieci_selektywne'].attributes.days + " dni" ]]]
            s_14: >
              [[[ return "za " + states['sensor.smieci_zielone'].attributes.days
              + " dni" ]]]
            s_15: >
              [[[ return "za " + states['sensor.smieci_popiol'].attributes.days
              + " dni" ]]]
            s_16: >
              [[[ return "za " + states['sensor.smieci_gabaryt'].attributes.days
              + " dni" ]]]
            s_17: >
              [[[ return "za " + states['sensor.smieci_choinka'].attributes.days
              + " dni" ]]]
          styles:
            card:
              - padding: 2px 20px 2px 20px
              - box-shadow: 0 0 0.95rem 0.2rem deepskyblue
              - border: solid 3px deepskyblue
            icon:
              - height: 80%
            grid:
              - grid-template-areas: ' "i i i" "s_label_1 s_1 s_11" "s_label_2 s_2 s_12" "s_label_3 s_3 s_13" "s_label_4 s_4 s_14" "s_label_5 s_5 s_15" "s_label_6 s_6 s_16" "s_label_7 s_7 s_17"'
              - grid-template-rows: >-
                  30% min-content min-content min-content min-content
                  min-content min-content min-content
              - grid-template-columns: 40% 40% 20%
            custom_fields:
              s_label_1:
                - justify-self: start
                - padding: 5px
              s_label_2:
                - justify-self: start
                - padding: 5px
              s_label_3:
                - justify-self: start
                - padding: 5px
              s_label_4:
                - justify-self: start
                - padding: 5px
              s_label_5:
                - justify-self: start
                - padding: 5px
              s_label_6:
                - justify-self: start
                - padding: 5px
              s_label_7:
                - justify-self: start
                - padding: 5px
              s_11:
                - justify-self: end
              s_12:
                - justify-self: end
              s_13:
                - justify-self: end
              s_14:
                - justify-self: end
              s_15:
                - justify-self: end
              s_16:
                - justify-self: end
              s_17:
                - justify-self: end
    label: |
      [[[
        var bri = entity.attributes.days;
        return '' + (bri ? bri : '0') + ' Dni';
      ]]]
    name: >-
      [[[ return
      entity.attributes.friendly_name.slice(7).charAt().toUpperCase()+entity.attributes.friendly_name.slice(8)
      ]]]
    styles:
      card:
        - height: 80px
      label:
        - color: gray
        - font-size: 60%
      name:
        - font-size: 80%
      img_cell:
        - height: 100%
      grid:
        - grid-template-areas: '"i" "n" "l"'
        - grid-template-rows: 1fr min-content min-content
    show_label: true
    state:
      - value: '0'
        color: yellow
        styles:
          card:
            - box-shadow: 0 0 0.95rem 0.2rem deepskyblue
            - border: solid 3px deepskyblue
      - value: '1'
        color: rgb(222, 95, 16)
        styles:
          card:
            - border: solid 1px orange
jak ktoś potrzebuje obrazków, wyjaśnienia czy coś śmiało pisać ![]()
Możesz udostępnić obrazki ?
Niestety po ostatniej aktualizacji Core do 10 wersji przestało mi działać repo, byłem zmuszony do aktualizacji wersji do nowszej w której jest inny sposób konfiguracji a jako że mam nie regularny harmonogram musze wstawiac daty w “annual” niestety nie moge rozgrysc jaki format ma miec data jeżeli jest ich wiecej niz jedna, czym je oddzielać?
Np. mam Sucha w dniach(day.mm) 12.10, 18.11 i 14.12
Mam utworzony harmonogram poprzez “pomocników”.
Czy jest jakiś sposób na edycję czy zawsze muszę tworzyć nowy harmonogram??
Mam ten sam problem, poradziłeś sobie jakoś?
W tym wątku są już chyba wszystkie potrzebne informacje.
Z:
Wykorzystaj Blueprint’a Include
→ utwórz nową automatyzację z wykorzytsaniem schematu bruxy70/include.yaml o nazwie Include dates
→ dodaj (jedną pod drugą) daty w formacie yyyy-mm-dd


